MLX Studio User Guide
MLX Studio is a publishing tool that content authors use to assemble and publish online courses on MLX-hosted tenants, such as Microsoft Virtual Academy (MVA), Microsoft Imagine Academy (MSIA), MOC On-Demand (MOD), Premier Services, and Microsoft Partner Network (MPN).
This user guide provides guidance on how to create your course before you begin using MLX Studio, shows you how to gain access to MLX Studio, provides instructions on how to assemble and publish a course, and gives you important tips that will make using MLX Studio understandable and easy.
We welcome your feedback! For questions or to provide feedback on this user guide, please email MLX Studio Help (studiohelpfb@microsoft.com).
IMPORTANT : This guide is primarily for content owners that use MLX Studio in the MVA tenant. If you are using MLX Studio in any other tenant, contact that tenant’s full-time employee (FTE) owner for more direction if you have any questions.
MLX Studio is an assembly and publishing tool. It is not an authoring tool . Therefore, before you begin using MLX Studio, you should plan, create, and organize your course so that you are ready to assemble and publish in MLX Studio.
If you are not using a Microsoft Studio to record video(s) for your course, ensure that the place in which you record has a professional atmosphere. For example, do not record your course in your house or in a public place, as this could make your course appear amateurish and unprofessional.
Most courses (and all MVA courses) are organized according to the module/lesson model. This model provides a well-organized, logical approach for subject matter, and divides it into easily digestible sections. This structure also provides a visual representation of course content when a learner views the published course outline on https://mva.microsoft.com/.
For more information on MVA course structure, refer to Step 3, Assembling Modules in MLX Studio.
TIP: Create your course content in a sequential order, because reordering components requires additional work in MLX Studio.
Construct your MVA course in this order:
· Module(s)
· Lesson(s)
· Knowledge check(s)
· Assessment(s)
IMPORTANT: All courses must have at least one module, one lesson, and one objective.
All Learning Experiences (LeX) course content must comply with Microsoft policies. The LeX Compliance Team ensures that all content is compliant with the requirements for published content.
During all content-development phases, consider the following compliance requirements:
· Accessibility
· Global readiness
· Third-party intellectual property (IP) and open-source software
Other compliance policies also may apply. For a complete review of applicable policies for your content, open a release record by using the Quality Essentials Tools: http://qe, http://gpweb/ , http://enable/, and LCA Web .
Requirements for content compliance
You must run PoliCheck on all content, with no exceptions . You can use your Microsoft corporate network (CorpNet) credentials to access and run PoliCheck. Additionally, if you’re creating a course in a foreign language, you must run PoliCheck in the target language and in English.
NOTE: For more information about how you can access and use Policheck, refer to MLX Studio Supporting Documents.
In addition to running PoliCheck on all content, there are a few more compliance requirements of which you must be aware as you create a course:
· All usage of Microsoft brands must adhere to the specifications that are listed on Brand Central .
· You must have the owner’s documented permission to use all third-party content , websites, documentation, icons, names, quotes, photos, logos, artwork, text, videos, music, studies, research, statistics, surveys, software, and other material.
· You must use LCA- approved fictitious names for companies and individuals, fictitious email addresses, and URLs. You can obtain these approved fictitious names from LCA Web.
· If your product contains sample code, you must include the appropriate license terms. For more information on the Microsoft open-source software (OSS) approval policy, refer to Using OSS at Microsoft .
· There should be no brand names, logos, or other third-party identifiers on the presenter’s attire or in the video. For example, the presenter should not wear a Star Wars shirt, and no figures should be visible (such as a Darth Vader doll) that could cause copyright issues. For more information, refer to Step 3.1 Using Videos in Your Course .
IMPORTANT: You must perform all virus, global readiness, PoliCheck, accessibility, and other scans on your course content before you upload files to MLX Studio , as you cannot run scans on files that are in MLX Studio.
Removal of non-compliant content
If content is uncompliant with Microsoft policies or otherwise deemed harmful to Microsoft or Microsoft customers, the content will be removed from the course. The compliance team will make every effort to contact and consult with content owners prior to removing content, but scenarios may arise in which mitigating business or legal considerations results in content removal prior to such contact and consultation.
In circumstances in which there is a dispute as to the appropriateness or copyright ownership of a particular course, the business stakeholders should work together to resolve the dispute with input from the legal department.
You must have permissions to access MLX Studio before you begin assembling your course for publication. Microsoft hosts MLX Studio online, and it is accessible from inside and outside CorpNet.
Request permissions to MLX Studio
Send an email to the MVA MLX Studio Administrators alias to request permissions. In the email, include your login email address (alias@microsoft.com), the reason why you require access, and the type of access that you require. For example:
· TO: MVA MLX Studio Administrators (mvaadmin@microsoft.com)
· SUBJECT: MLX Studio access request
· BODY: Your name, login email address, reason for access, and type of access (guest, author, approver, or administrator).
NOTE: If you have a Partner account or do not have access to CorpNet, ask your FTE manager to request permissions for you.
After you are granted access, you will receive an email with an enrollment link. Click the link, follow the MLX Studio enrollment process by using your login credentials, and then accept the Terms of Use to access MLX Studio.
TIP: You should bookmark the MLX Studio link so that you have it for future reference.
If you have an issue logging in to MLX Studio, send an email to MVA MLX Studio Administrators (mvaadmin@microsoft.com) and let them know the issue.
IMPORTANT: Before you begin Step 1 below, review the MVA MLX English Workflow Visio so that you understand the correct workflow for publishing your course, and so you can obtain the templates that you will need during the assembly process.
Step 1: The Plan Page—add basic information and metadata
After you create and organize your course, and run the necessary checks to determine that your course is compliant with Microsoft standards and policies, you are ready to use MLX Studio.
When you first open MLX Studio you will see the MLX Studio Dashboard. Until you create a new course, your Dashboard will be blank as shown in Figure 1.
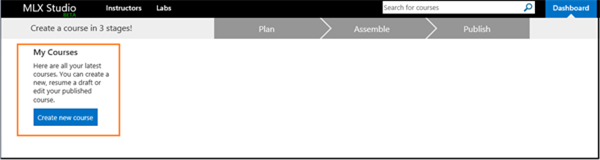
Figure 1 . The blank Dashboard that appears when you first open MLX Studio. On the Dashboard, there is an option to Create New Course or Search for Courses. There are also three tabs labeled Plan, Assemble, and Publish.
On the dashboard, click Create new course. The first page that appears is the Plan page, as shown in Figure 2.
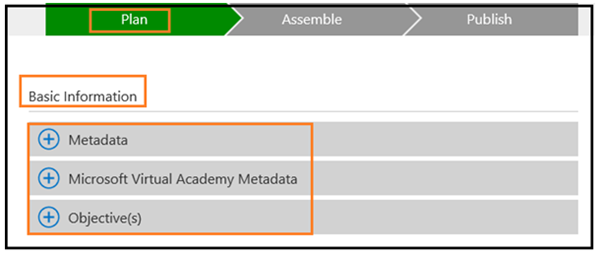
Figure 2. The Plan page in MLX Studio. This page has four sections that you must complete: Basic Information, Metadata, Micorosoft Virtual Acadmeny Metadata (MVA courses only), and Ojective(s).
The information on the Plan page is required, and you will not be allowed to advance or add content in MLX Studio without entering all required information on this page. The page’s required fields have a red asterisk (*).
You must complete the following four sections on the Plan page before you can proceed with building your course:
· Basic information . Contains the Language, Course number, Level, Title, Description, and Publish Target(s) fields.
· Metadata. Contains the Primary Audience, Software Product(s), Topics, and Tags fields.
· Microsoft Virtual Academy Metadata (MVA courses only) . Contains the Audience Theme, Detailed Audience, Type of content, Get Help (Forum) URL, SEO Title, and Title Manager GUID fields.
· Objective(s). Contains descriptions of what the student will learn in each module.
IMPORTANT: You must enter your module objectives on the Plan page, so create them (based on module content), and have them ready to enter before you begin using MLX Studio.
Complete the Basic Information section
In this section, you will add basic information about the course.
TIP: For more information on best practices for populating the following fields in this section, refer to Step 2 Staging a Course in MLX Studio .
In the Basic Information section, you must complete the following fields:
· Language. Enter the language in which the course is being delivered.
· Course number . Enter the unique number that is provided for every MVA course. To request a course number, use the course number template in the MVA MLX English Workflow Visio.
· Level. Select the course’s level of difficulty, from the following choices:
o 100—Beginner
o 200—Intermediate
o 300—Advanced
o 400—Expert
· Cover art. Select the applicable brand image from the MLX Cover Art Library . If you want to create your own cover art, you must follow the MLX Cover Art Guidelines , and you must use the MLX Cover Art Template .
TIP:For more information about how to create original cover art, refer to Step 2, Staging a Course in the MLX Studio .
· Title. Add a very descriptive name for the course. Best practices for the title field are:
o 100-character limit, including spaces. For English courses, the target is 60 characters because a localized course flows directly from the English title.
o Do not include <>;{} characters in the title.
· Description. Use a concise description of the course material and the primary goal(s) of the course. This information populates search results, so create a detailed description.
· Publish Target(s). Select Microsoft Virtual Academy.
IMPORTANT: Do not select more than one publish target; MLX Studio does not support dual publishing at this time. If you have a business requirement to publish to more than one target, contact MVA Release Support team (mvarelsup@microsoft.com) for help.
· Planned release date . Choose the date on which you want your course to be live at https://mva.microsoft.com/.
· Status. Select your course’s status from the drop-down list.
Metadata helps populate search results that return when people search for a course or topic online, or at https://mva.microsoft.com/.
In the Metadata section, you must complete the following fields:
· Instructors. Select from the existing instructor list for a course or add a new one. If you add a new instructor, additional information is required. For more information on adding a new instructor, refer to the Metadata section in Step 2, Staging a Course in MLX Studio .
· Primary Audience. Select the option that applies to your course.
· Other Audience(s). This field is optional, and you can select multiple values.
· Software Product(s). Select an option that applies to a course. You can select up to three values.
NOTE: Do not choose more than three software products in this field. Choosing more than three can make it difficult for learners to find the training that they are looking for, and courses will appear on product pages where they are not relevant.
· Topics. Select an option that applies to your course. The options that you choose here will determine on which topic page a course appears at https://mva.microsoft.com/. You can enter up to three values.
NOTE: Do not add more than three topics in this field. Choosing more than three can make it difficult for learners to find the training that they are looking for, and courses will appear on topic pages where they are not relevant.
· Tag(s). Use tags, or meta keywords, to drive results when a person searches for a course. If you tag a course properly, it will be easier for learners to find it. To add tags, type in each keyword individually, and then press Tab or Enter.
· System Requirements . Leave this field blank. System requirements are identical for all MVA courses and are entered by MLX Studio.
· Pre-requisites: This field is optional. Only use this field if there is prerequisite knowledge or coursework that a learner must have to successfully complete the course.
· Accessibility Requirements . Leave blank this field blank. Accessibility requirements are identical for all MVA courses and are entered by MLX Studio.
Complete the Microsoft Virtual Academy Metadata section (applies to the MVA tenant only)
The information that you provide in the Microsoft Virtual Academy Metadata section is used to catalog MVA courses. Furthermore, it provides data for search results on https://mva.microsoft.com/and in search engines.
In the Microsoft Virtual Academy Metadata section, you must complete the following fields:
· Audience Theme . Select the option that applies to your course.
· Detailed Audience . Select the option that specifies the audience that your course is targeting.
· Type of Content . Select the option that applies to your course.
· Get Help (Forum) URL . Enter the URL that links to a course’s Get Help (Forum) page. To request a Get Help (Forum) URL, use the template in the MVA MLX English Workflow Visio.
· SEO Title. Enter the search engine optimization (SEO) title to enhance search results when a learner searches for your course.
· Title Manager (TM) GUID . Obtain a graphical user ID (GUID) from Title Manager v1. Do not use Title Manager vNext to get the GUID. If you do not have access to Title Manager v1, contact MVA release support for assistance.
NOTE: Non-LeX courses and courses that are created by subsidiaries in languages other than English do not require a TM GUID.
· SEO Description . Provide a concise course description that will enhance web search results. This field has a 156-character limit.
Add at least one objective for each module in the objective free-form text field.
TIP: For more information about how to write good objectives, refer to the Writing Concise Objectives section in Step 2 Staging a Course in MLX Studio .
When you complete all the required fields, click Next to move to the Assemble page.
Step 2: The Assemble Page—add content to your course
You add your course files on the Assemble page, which displays immediately after you complete the Plan page correctly, and then click Next. On the Assemble page, you add content components to build your course in the following order: module, lesson, knowledge check, and assessment.
Every course must contain at least one module.
IMPORTANT: You must complete all compliance scans on files before you upload them to MLX Studio. This includes, but is not limited to, virus scans, the LCA OSS approval process, and global-readiness scans. Microsoft must own, or have proper license to distribute, all content, including videos that are available publically and any other content available on the Internet. Please note, this includes YouTube videos and other third-party content. For more information, refer to http://qe.
To add a module:
1. On the Assemble page, click Assemble Course , and then on the next page, click Add Module .
2. On the Add Module page, you must provide the following information about the module:
o Module Title . Enter an accurate description of the module content, with a specific title. This field has a 100-character maximum limit.
o Module Objective . Select the corresponding objective from the list of course objectives that you entered in the Objectives section previously.
o Module Description . Provide a summary that describes the module and its lessons, and then click Done .
MLX Studio now adds your module, and you can continue assembling your course.
A lesson contains the course content that relates directly to the module that it is in. Each module must contain at least one lesson, and each lesson is one single content type. Figure 3 depicts the icons that are associated content types that you can use, which include video, code, documents (Microsoft Word, Microsoft Excel, Microsoft PowerPoint, and Adobe Acrobat), code, simulations, links, and labs.
TIP: For more information about using content types, refer to Steps 3.1-3.6 under MLX Studio Supporting Documents.
IMPORTANT: All video content that you use in your course must have accompanying closed caption (CC) files. After you upload all the videos in your course, order the CC files for each video by using the Learning Experiences Closed Captioning Delivery Service. All videos must have closed captions uploaded on https://mva.microsoft.com/ within two weeks of publication .
When the CC delivery service returns your CC files in email:
· The release team will run PoliCheck on the CCs and provide sign off on the PoliCheck results.
· The release team will upload the CCs into MLX Studio. If the CCs are available before your course is ready to publish, the course will go live with CCs. If the CCs come in after your course is published, the release team will add the CCs, and republish the course.
· When the CCs are live on https://mva.microsoft.com/, the release team will send you an email with a link to the course so that you can verify that everything is working to your satisfaction.
To add a lesson to a module:
1. Under the module that you created, click Add Lesson.
2. On the Add Lesson page, enter a title for the lesson.
3. Click the Content tab to view the types of content that you can use in MLX Studio, as shown in Figure 3, and then click the type of content that you want to upload.
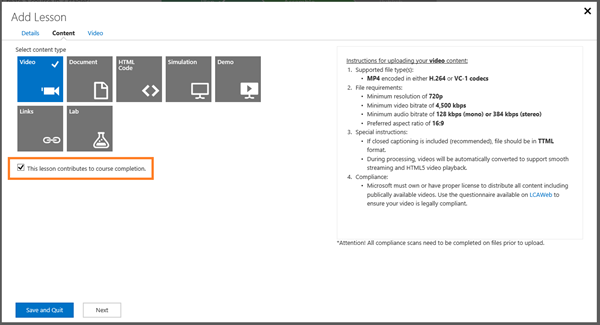
Figure 3 . The Add Lesson page in MLX Studio, showing the content types that you can use. The This lesson contributes to course completion check box is selected by default.
IMPORTANT : Do not clear the This lesson contributes to course completion check box. It is the default value, and should remain selected. If you clear the check box, the learner will not be required to view the lesson to complete the course.
4. Click Next, and then click Browse to navigate to the content that you want to upload, and then click Save and Quit .
TIP: Hover over each content type, and in the right pane, you will see instructions for uploading that content type, as shown in Figure 3.
After you load the lesson content, MLX Studio returns you to the Assemble page, where you can view the progress of your lesson’s upload, as Figure 4 shows.
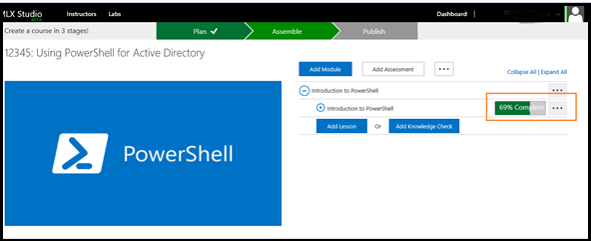
Figure 4. The Assemble page in MLX Studio, showing a bar that provides the progess of lesson content as it is being uploaded.
If you create a lesson and then click Save and Close (and do not upload any content to the lesson), MLX Studio returns you to the Assemble page, and you will see a red asterisk next to your lesson title, as Figure 5 shows. This indicates that the lesson is incomplete, and that you need to add content to the lesson.
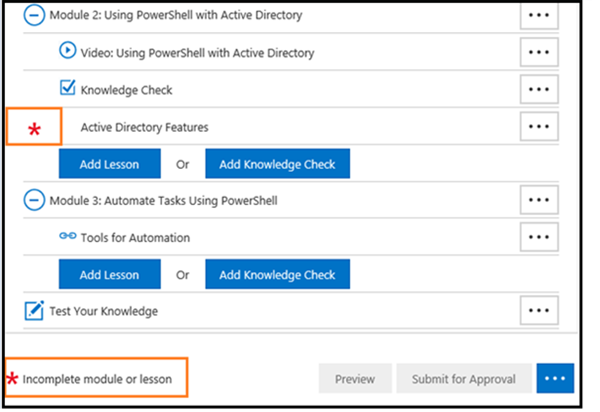
Figure 5 . The Assemble page, with a red asterisk next to a lesson. This indicates that the lesson is incomplete.
To add missing content:
1. Click the ellipsis next to the lesson that is missing content, and then click Edit Content .
2. On the Edit Content page, click the content type that you want to add and then click Next.
3. Browse to the content that you want to upload and then click Open .
4. On the Edit Content page, click Save and Close to upload your content.
If your content uploads correctly, you will see the progress bar shown in Figure 4.
When you upload your content completely and correctly, you will see the Preview button, Submit for Approval button, and three ellipses at the bottom of the Assemble page, as shown in Figure 6.
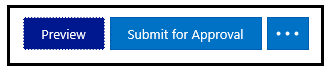
Figure 6. The options that appear at the bottom of the Assemble page when content is uploaded correctly. The options that appear are the Preview button, the Submit for Approval button, and three ellipses.
Preview option. When you click the Preview option, MLX Studio launches the MLX course player. The course player allows you to review module and lesson content to ensure that it is working and rendering correctly in MLX Studio, and enables you to view your course as it will appear on https://mva.microsoft.com/. Figure 7 shows the tabs as they appear in the course player.

Figure 7 . The three tabs that appear when you click Preview and open the course player. The tabs are icons that represent Course information, Table of Contents, and Resources.
The three views in the course player are:
o Course information tab. This tab looks like a lower case “i”. This view shows the outline of your course.
o Table of contents tab. This tab looks like three horizontal lines with dots to the left of each line. This view shows all the course content in sequential order, and you can click on each element to open and review it for accuracy.
o Resources tab. This tab looks like a downward arrow with a horizontal line beneath it. This view shows all of the bonus material in your course that customers will be able to download from https://mva.microsoft.com/.
Submit for Approval option. This is self-explanatory. However, do not submit your course for approval until you have followed all the course publishing requirements listed below in the MVA publishing requirements section.
Three ellipses option. Click the ellipsis, and the Save and Quit option will appear. Use this option if you want to stop working on your course and come back to it later. All work that you did to this point will be saved.
If you want to validate a learner’s knowledge at the module level, you can add a knowledge check, which is similar to a quiz.
To create a knowledge check:
1. Click Knowledge Check under the module in which you want to add the check. This will open the Add Knowledge Check page, which Figure 8 shows. You can use single choice, multiple choice, or true/false questions in a knowledge check.
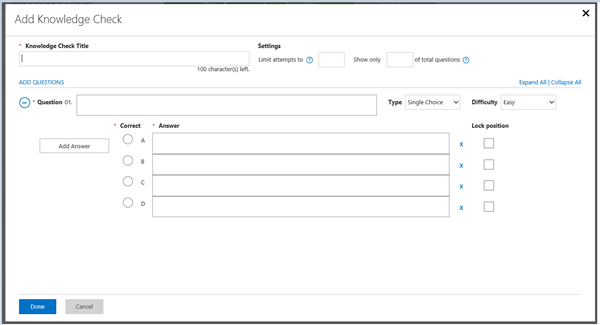
Figure 8 . The Add Knowledge Check page in MLX Studio, on which you add the title, questions, answers, and other information about the knowledge check.
2. On the Add Knowledge Check page, enter the Knowledge Check Title . There is a 100-character limit for this field.
3. Under Settings , add:
o Limit attempts to __ . Add a number that will set the amount of times that a learner can take the knowledge check before having to restart the module.
o Show only _ of total questions . Indicate how many of the total questions that you want to appear in a given session. This value cannot be more than the number of questions. For example, you cannot add 3 in this field if you only have two questions.
4. In the Question 01 field, add the first question.
NOTE: To add more questions, click the blue ADD QUESTIONS link for every question that you want to add.
5. In the Type and Difficulty drop-down lists, choose the type of question that you want to use and its level of difficulty.
6. In the Answer field, type the answers to your question. Under Correct, check the box that has the correct answer(s).
7. If you want to lock the order in which the questions appear, select Lock Position for each question. If you want the questions to appear in random order, do not select the Lock Position box.
Adding an assessment is similar to adding a knowledge check. It provides the opportunity for your learners to show that they understand a module and/or your course content. For assessments, you can use single choice, multiple choice, or true/false questions. Additionally, you can establish a minimum percentage of correct answers that learners must attain to receive a passing score.
To create an assessment:
1. On the Assemble page, click Add Assessment. The Add Assessment page appears, as Figure 9 shows.
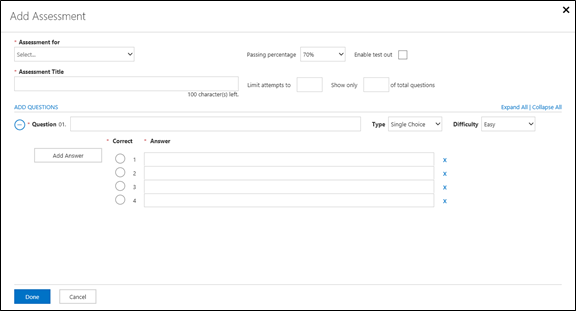
Figure 9. The Add Assessment page in MLX Studio, on which you add the title, questions, answers and other information for an assessment.
2. In the Assessment for drop-down list, select whether the assessment is for:
· An individual module . You can only associate an assessment with a module that you have already created in MLX Studio, and your questions must assess only content that is currently in the module. Additionally, you will be prompted to select the module with which you want to associate the assessment. The assessment will appear under the associated module.
· The full course . If you select this option, your questions must assess content that you provide throughout the entire course, not just content from one module.
3. In the Assessment Title field, provide a title for the assessment, which should be the same as the module title.
4. In the Passing percentage field, enter a passing percentage. The default value for MVA courses is 70%.
5. Select the Enable test out check box if you want to allow the learner to take the assessment without completing the module.
IMPORTANT: If you disable the test out feature and require a passing percentage (70% correct to pass, for example), leaners may fail to complete this assessment and the course. The MVA best practice is to enable test out for all assessments.
6. In the Limit attempts to field, enter a value that defines how many times a learner can attempt an assessment. The best-practice value for MVA courses is five.
7. In the Show only _ of total questions field, enter a number to limit the number of questions that appear. If you populate this field, the assessment asks only the number of questions that are equal to this field’s value. This allows you to create a pool of questions that the assessment uses. For example, you might add 10 questions to an assessment, but if you only specify a value of 5 in this field, the assessment will consist of five questions for the learner that are randomly selected from the pool of 10. This prevents leaners from memorizing the answers to an assessment, since the questions change each time they take the assessment. You should set this value to at least 5.
Add questions to the assessment
After you add the assessment details on the Add Assessment page, you will now add the assessment questions, as Figure 10 shows.
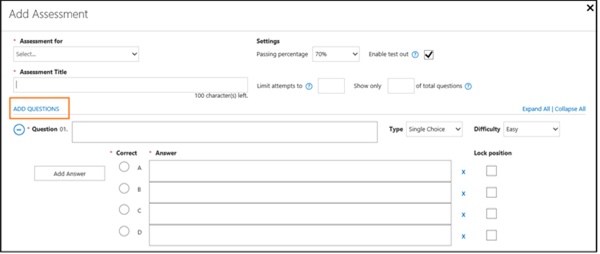
Figure 10 . The Add Assessment page in MLX Studio, highlighting ADD QUESTIONS, which you click to add a question, and then underneath which you enter the text of the question, answers, the type of question, and difficutly.
The assessment fields that you must complete are:
· Question. Enter the full text of the question here. The question should be specific and relevant to the module content that you are assessing, and the difficulty should be relative to the course level. After you enter the information for the first question, you can create additional questions by clicking the ADD QUESTIONS link at the top of the Question section, and then completing all of the fields.
· Type. Select the question type:
o Single Choice . There is only one correct answer, and the learner may select one answer only.
o Multi Choice . The learner can choose any or all of the answers as correct.
o True/False . There is a statement, and the learner must decide whether it is true or false. There is only one correct answer.
· Difficulty. For the learner’s reference, indicate the relative difficulty of the question. This field has no effect on the question’s value with respect to scoring.
· Correct. Select the radio button to indicate the correct answer(s). Single Choice and True/False questions can have only one correct answer, but any or all answers may be correct for Multi Choice.
· Answer. Enter the answer choices for the question. Answers should be clear, concise, and unique compared to all other answers for that question. By default, single choice and multi choice questions have four answer fields. If you want to add more answers, click the Add Answer button. To remove answers, click the blue x to the right of the answer field.
NOTE: You cannot have fewer than two answer options. There is no maximum for how many answers a Single Choice or Multi Choice question can have. Additionally, a good starting point is to have four answers, and very few questions require more than eight answers.
When you complete the assessment, click the Done button.
NOTE: Assessments that are attached to a module appear at the end of the module, and an assessment that is attached to the full course appears at the end of the course, which Figure 11 shows. It does not appear under any individual module.
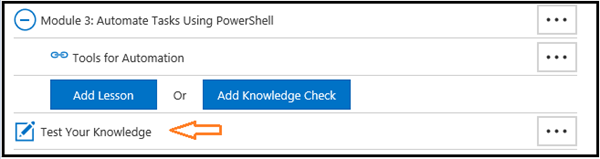
Figure 11 . The Assemble page in MLX studio, showing that the full course assessment, called “Test Your Knowledge”, has been entered correctly and appears at the end of the final module.
Add bonus material
Sometimes in your course you would like to provide additional material that will further help the learner. Bonus material might include study guides, sample code, templates, PowerPoint decks, and similar offerings, and should help learners understand concepts that the course presents.
To add bonus material:
1. On the Assemble page, click the ellipsis, and then click Bonus Material, as shown in Figure 12.
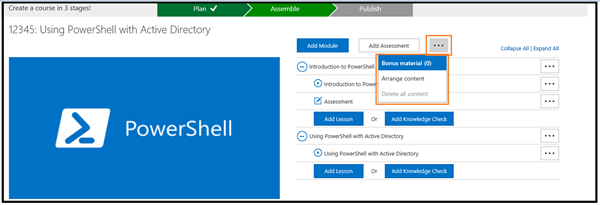
Figure 12 . The Assemble page in MLX Studio, highlighting the ellipsis that you click that opens a field in which you add bonus material to your course.
2. On the Bonus Material page, you can either:
o Click Browse, navigate to the file(s) that you can want to add to the course and click Ok.
o Click External Link, add the name and URL for the resource that want to provide to students, click Add, and then click Ok.
NOTE: Using either option above on the Bonus Material page, you will see a status bar that displays the name and status of your bonus material upload. Also, when you click Ok, your upload will continue in the background.
You will be returned to the Assemble page where the Preview button now appears.
3. Click Preview to open the course player.
The Resources tab will now appear in the course player, as shown in Figure 13. Click on the arrow with the line under it to verify that your bonus material was uploaded correctly.
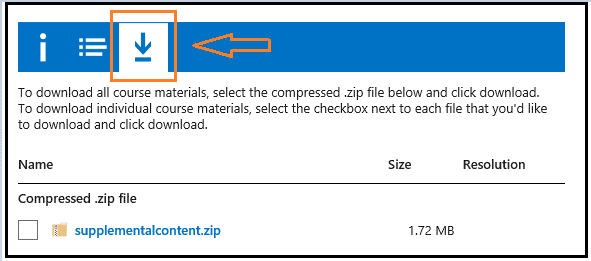
Figure 13. The Resource tab highlighed in the course player showing the uploaded bonus material.
After you upload content into MLX Studio, you can modify, add, or delete your course’s content.
Modify basic information and metadata
To modify your course information or metadata, open the course in MLX Studio, and then click Resume Assembly. This takes you to page on which you can add, delete, or modify course metadata. After you complete your changes, you can Save and Quit to exit the course, or you can click Next to modify course content.
When you add modules and lessons to your course, you should enter them in sequential order. However, you might have a situation in which you need to modify or rearrange course content.
To modify module content:
1. Open your course in MLX Studio, click Resume Assembly , and then click Next .
2. At the top of the course content list, to the right of the module, click the ellipses.
3. Click Edit module. There are two choices:
o Edit Module . This opens the Edit Module page, from which you can modify the module title, module objective, and module description.
o Delete Module . This opens a box in which you confirm that you want to delete the module. This cannot be undone.
IMPORTANT : If you click Yes to delete a module, it will be deleted from the course, and you cannot undo this action. If you decide at a later point that you want to include the module again, you have to recreate it in MLX Studio.
To modify lesson content:
1. Open your course in MLX Studio, click Resume Assembly , and then click Next .
2. At the top of the course content list, to the right of the lesson, click the ellipses.
3. Click Edit Lesson , which provides options for modifying lesson content, as Figure 14 shows. The options for modifying lesson content are:
NOTE: If you delete content, you will see a red asterisk next to the lesson from which you deleted content, and you will see a warning note at the bottom of the page. This indicates that the lesson is incomplete, and you must add content to the lesson or delete it.
o Edit Lesson . If you click this, the specific page opens for that content type. You then can modify the content information.
o Delete Lesson . If you click this, the Delete Lesson box opens and asks if you’re sure that you want to delete this Lesson and states that once it’s deleted, it will be removed from the course and cannot be undone . You can then either click Yes or Cancel.
IMPORTANT: If you click Yes, the lesson will be deleted from the course, and you cannot undo this action. If you decide at a later point that you want to include the lesson again, you will have to recreate it in MLX Studio.
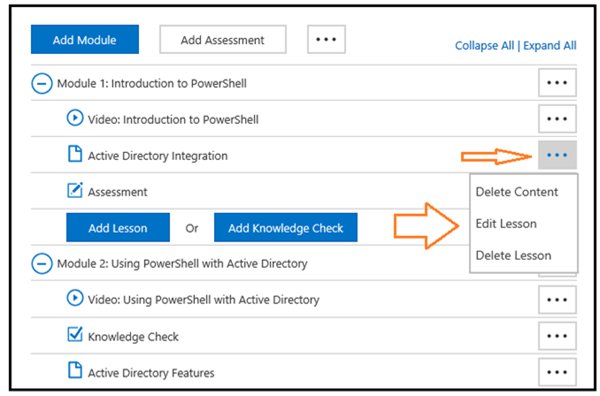
Figure 14 . The Assemble page in MLX Studio, highlighting the ellipsis that you click next to a lesson, so that you can perform various editing options, including: Delete Content, Edit Lesson, and Delete Lesson.
Additionally, please note that if you click Edit Lesson for a video, you will see Video Bookmarks as a choice. This choice does not appear when you edit other content types.
To rearrange course content :
1. Open your course in MLX Studio, click Resume Assembly , and then click Next .
2.
At the top of the course content list, click the
ellipses
, and then
click Arrange content
, which
Figure 15 shows.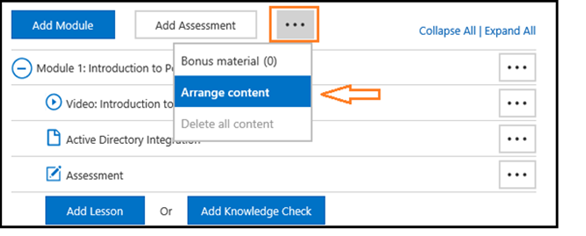
Figure 15 . The Assemble page in MLX Studio, highlighting the ellipsis that you click, which provides choices for modifying your course’s content.
3. On the Arrange content page, click the up and down arrows to rearrange modules and/or lessons, as Figure 16 shows. When you finish arranging the content, click Done.
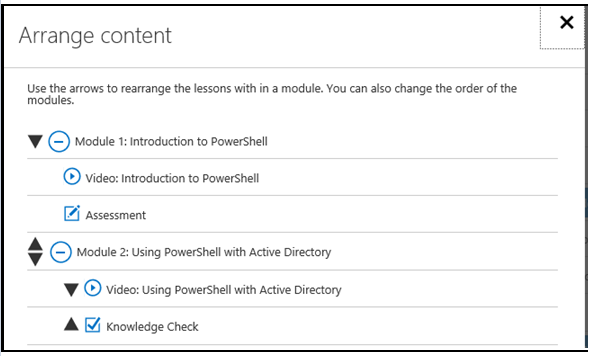
Figure 16 . The Arrange content page in MLX Studio, showing the up and down arrows that you would click to to rearrange modules and lessons.
You will be taken back to the Assemble page, and the Preview button will be available at the bottom of the page.
4. Click Preview to verify that the modules and lessons are in the order that you intend. If you decide you want to change the order of modules and lessons, repeat steps 2 through 4 above, and rearrange them again.
NOTE: If you rearrange numbered modules, you should ensure that when you rename them, they are in the correct numerical order. For example, if you move Module 2 up, so that it becomes the first module, make sure that you rename it “Module 1”, and further check that your previous first module has a new number, such as 2 or 3, or whatever number applies.
To ensure quality, functionality, and legal and regulatory compliance, courses undergo a publishing review. The following steps outline the high-level publishing process that you must follow for courses that you create by using MLX Studio:
1. Plan your course, assemble the content, and upload the content to MLX Studio, ensuring that all content meets compliance requirements .
2. Perform a complete review and preview of your course. You must review your entire course, including all content, links, and external sources, for functionality and compliance. To do this in MLX Studio, go to the Assemble page, click the Preview button, and then launch and review all content in the course player.
3. Submit your course to test and SEO edit by using the template in the MVA_MLX_English_Workflow_Final Visio document (applies to MVA courses only). Test ensures that all components of your course are working properly and SEO edit ensures that all MVA courses are consistent and discoverable for learners.
For more information on the testing process, refer to Step 4, Is my Content Ready?
IMPORTANT: Edit and test must provide sign off for your course before you can publish it (applies to MVA courses).
Best practices for on-time publishing
You should apply the best practices that the following sections detail as you assemble your course so that the publishing process is smooth and quick.
Check your content for compliance
Verify your content for corporate compliance as you add it to MLX Studio. Be aware of the compliance requirements for each content type, and take the necessary steps to fix compliance issues early. If you determine that resolving a compliance issue will take longer than expected, or if it involves waiting for a third party or permissions, it is better if this occurs while you are working on other aspects of the course, rather than when the course is ready to publish.
Preview your course completely before submitting for approval
Before you submit your course for approval, be sure to click Preview and review all of your content, including videos, files, code, and bonus material to ensure that it launches, appears and functions as expected.
TIP: If you Preview and check your content in the course player for issues as you add the content , you can find and correct problems early in the course-assembly process.
To preview content:
1. On the Assemble page, click Preview to launch the course player.
2. Click the Syllabus tab as shown in Figure 17.
3. Click through all of the course content to ensure that everything launches properly in the course player and that it looks as you expect.
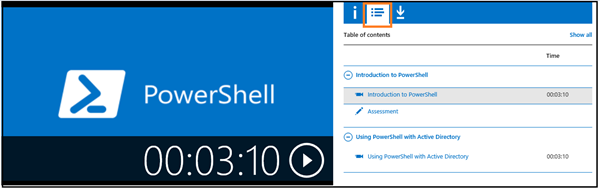
Figure 17 . The course player in MLX Studio, highlighting the Syllabus view.
IMPORTANT: The way that your course looks in the course player is the way that it will appear on https://mva.microsoft.com/. Therefore, you should ensure all content is functioning to your satisfaction before you submit for publication.
Step 3: Publish your course in MLX Studio
After you receive sign off from the editor and the LeX content test team (applies to MVA courses), you are ready to publish your course
To publish your course :
1. Open your course in MLX Studio. MLX Studio will open at your course’s Assemble page.
2. At the bottom of the page, click Submit for Approval.
Figure 18 shows the Submit for Approval box, in which you verify that your course is compliant with Microsoft policies and that you are responsible for its content.
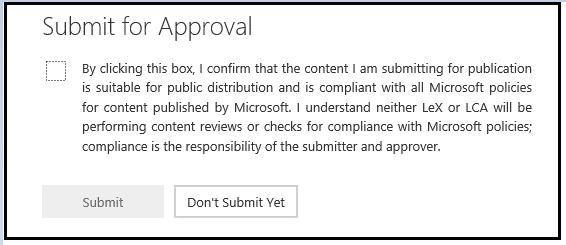 Figure 18
. The
Submit for Approval box in MLX Studio, showing a check box that you must click to
confirm that you are responsible for the course content and its compliance with
Microsoft policies.
Figure 18
. The
Submit for Approval box in MLX Studio, showing a check box that you must click to
confirm that you are responsible for the course content and its compliance with
Microsoft policies.
If you click Submit, this submits your course to the LeX Release Team for the final publication stage, and the LeX release team will approve or reject your course.
If you click Don’t Submit Yet, you will return to the Assemble page.
If your course meets all publishing requirements, the LeX release team will approve it for publication, and you will receive an email confirmation of the approval.
NOTE: It may take up to 24 hours for your course to be live on https://mva.microsoft.com/.
When your course is live, you will receive another email that indicates that your course is live. The mail will include the link to the live course and a link to subscribe to your course’s RSS feed.
If your course does not meet all publishing requirements, the LeX release team will reject it. If this happens, you will receive an email that indicates why the course was rejected and possible solutions that can help you fix your course, and then resubmit it for publication.
There are several reason why the LeX release team may reject an MVA course. For example, if it does not have:
· A Title Manager GUID (MVA English and localization team courses only)
· Official sign off from edit and test (MVA courses)
· A Get Help (Forum) URL (MVA courses only)
NOTE: When the release team rejects a course, the course reverts back to the Draft stage in MLX Studio, so that you can make appropriate changes.
After you fix your course’s issues, you must resubmit if for approval in MLX Studio. The release team then will reassess the course, approve it if all issues have been fixed successfully, and send you mail when the course is live on https://mva.microsoft.com/.
For questions or to provide feedback on this user guide, please email mailto:studiohelpfb@microsoft.com.